
Azure recently introduced its first burstable VM size - the B-series. This VM type is meant to compete directly with AWS' T2 instances. In the below few words (or more :smile: ) I try to explain what this means and why you should care. If you still have questions after reading, hit me up on Twitter or leave a comment below.
So why do I need a burstable size anyway?
If you have applications that remain idle for a long time and burst occasionally, then the B-series might be the perfect fit for you. To understand why, we first need to understand how the pricing for a VM works in the cloud. When you deploy a VM in the cloud, you’re paying the same regardless of the % of CPU used. Therefore, anytime your VM is not using 100% CPU, you are leaving computing cycles on the table that you are paying for. Typically, users will solve this problem by deploying a VM size with smaller number of cores and lesser RAM. However, sometimes the application demands more computing power. This is a classic vertical scalability problem. As the physics of semiconductors limits the number of cores, CPU clock speeds and RAM you can add to a single node, users have solved this problem by developing applications that can scale horizontally to more nodes.
But, if you have an application that is small enough for a single node and only needs to use 100% of the CPU for a small time, burstable sizes will provide you the most cost-effective way to run it.
Alright, tell me about this B-series
Now, that we’ve covered why burstable sizes make sense for some applications, let’s understand the benefits. The most obvious benefit is going to be the cost. Let’s imagine you have an application that is currently running on the Standard_A2_v2 VM size. This gives you 2 cores/4 GiB RAM to play with. The cost to run this VM size is $0.076 per hour or $54.72 per month. Now consider the new Standard_B2s size that offers the same number of cores & RAM but only costs $0.047 per hour or $33.84 per month. That amounts to 38% savings!
Here is the list of all the sizes in the B-series:
| Size | vCPU’s | Memory: GiB | Max CPU Perf of VM | Base CPU Perf of VM | Starting Credits | Credits Banked / Hour | Max Banked Credits |
|---|---|---|---|---|---|---|---|
| Standard_B1s | 1 | 1 | 100% | 10% | 30 | 6 | 144 |
| Standard_B1ms | 1 | 2 | 100% | 20% | 30 | 12 | 288 |
| Standard_B2s | 2 | 4 | 200% | 40% | 60 | 24 | 576 |
| Standard_B2ms | 2 | 8 | 200% | 60% | 60 | 36 | 864 |
| Standard_B4ms | 4 | 16 | 400% | 90% | 120 | 54 | 1,296 |
| Standard_B8ms | 8 | 32 | 800% | 135% | 240 | 81 | 1,944 |
What are these credits?
If you’ve deployed a VM before, most of the specs should be familiar to you. But the B-series introduces a credit bank that determines how long you can use 100% of the CPU. The simplest way to understand this is that when VM is idle it builds up a credit balance. The VM can then use this credit balance to burst up to 100% CPU when the workload needs it. The combination of concepts in the last 4 columns in the above table, determine how long your VM can burst to 100% CPU usage.
Starting Credits
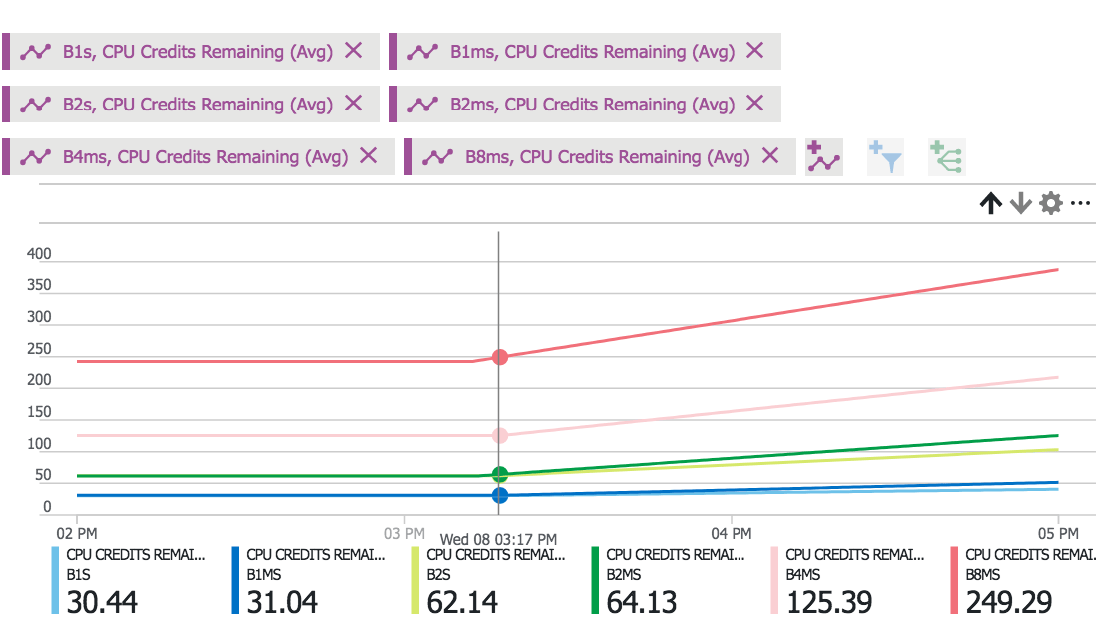
Every VM size in the B-series starts off with a fixed number of credits. The formula for determining this is:
Starting Credits = 30 x # of Cores
Here’s a visual look at the starting credits across all the B-series sizes 1 minute after starting:
How do you build credits?
Base CPU perf of VM
Base CPU perf of VM is the threshold of CPU usage above or below which the credit balance changes. This value is shared amongst the # of vCPUs on the VM. For example, the Standard_B8ms VM size has Base CPU perf of 135%. This is shared amongst the 8 vCPUs that make up this VM size. The formulas to determine how the Base CPU perf affects the credit balance are:
Current CPU usage < Base CPU perf of VM  = Increase credit balance
Current CPU usage > Base CPU perf of VM  = Decrease credit balance
Current CPU usage == Base CPU perf of VM = No change in credit balance
Credits Banked / Hour
To determine this value, we need to look at the number of credits you can bank or use per minute for each of the sizes which is determined by the following formula
(Base CPU perf of VM - CPU Usage) / 100 = Credits bank or use per minute
Assuming ~0% CPU usage, this formula gives us the following table for max credits banked per minute:
| Size | Max credits banked per minute |
|---|---|
| Standard_B1s | 0.1 |
| Standard_B1ms | 0.2 |
| Standard_B2s | 0.4 |
| Standard_B2ms | 0.6 |
| Standard_B4ms | 0.9 |
| Standard_B8ms | 1.35 |
Let’s put the above knowledge to test on a typical use case.
Example
Assume you have deployed a Standard_B8ms VM and have a single-threaded application that has 1 core pegged at 100%. The cumulative CPU usage of the VM is 100%. Now using the above formula, we can calculate the amount of CPU credits your VM is banking per minute:
(135 - 100) / 100 = 0.35 credits banked per minute, or
0.35 x 60 minutes = 21 credits banked per hour
Max Banked Credits
This value represents the maximum number of credits you can build up for use later.
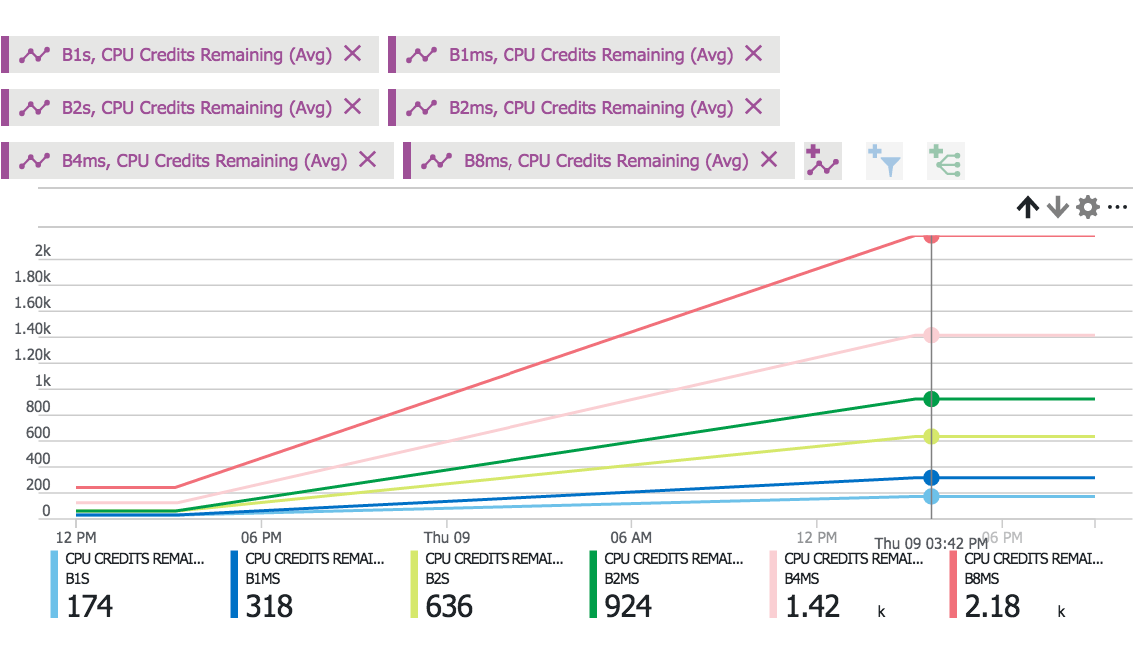
NOTE If you stop deallocate the VM, then the credits built up are lost.
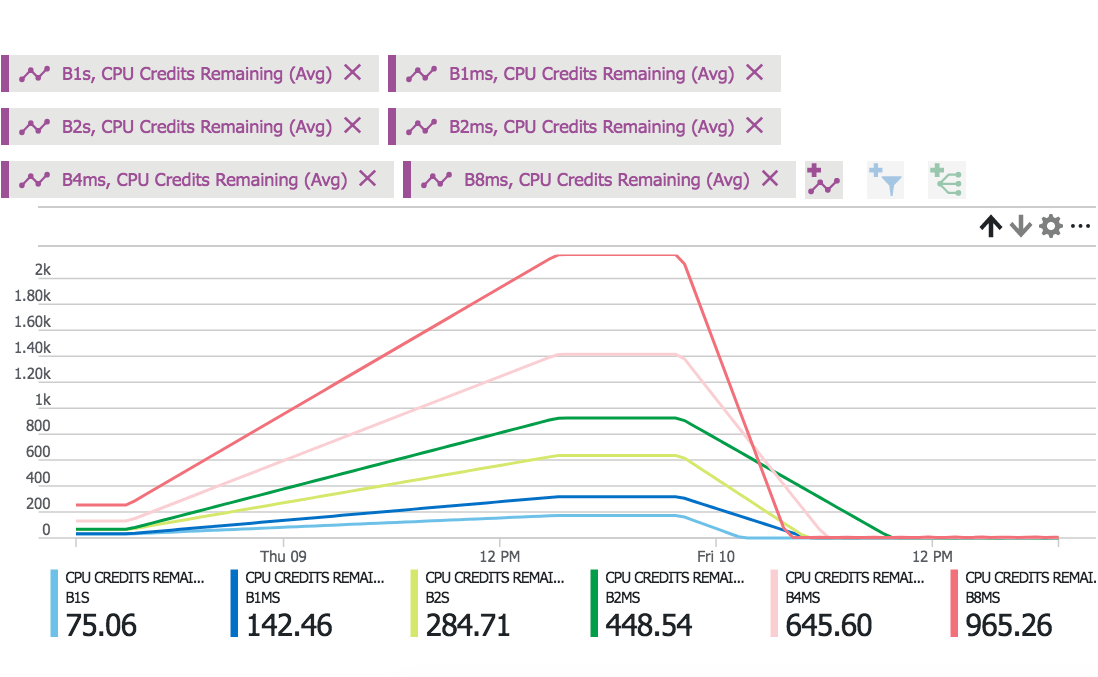
Here’s a look at the different VM sizes building up the credits. In this example, the VMs are left idle after creation and banked credits increases for 24 hours until it reaches the credit limit.
Let’s use these credits!
When you have credits in the bank, your VM can burst beyond the “Base CPU Perf” allowed for that VM size. The amount of credits spent can be determined by the same formula we used to determine how many credits are banked per minute i.e.
(Base CPU perf of VM - CPU Usage) / 100 = Credits bank or use per minute
Let’s take another example to determine the rate at which credits are spent.
Example spend
In this example assume the Standard_B8ms VM you deployed previously is using all of the 8 cores. The cumulative usage of the VM is 800%.
Using the above formula, we get:
(135 - 800) / 100 = -6.65 credits banked per minute, or
6.65 credits spent per minute, or
6.65 x 60 minutes = 399 credits spent per hour
Experimenting with credits
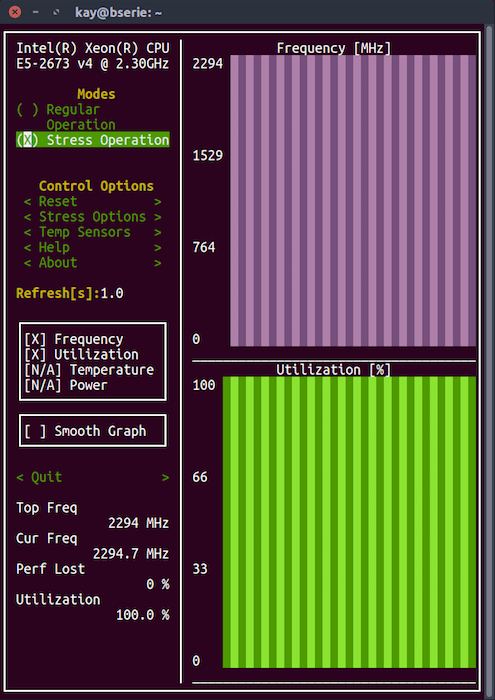
Let’s take a look at the credit usage of different VM sizes in the B-series corresponding to the CPU load and throttling. In the experiment below, 100% CPU usage was generated for more than 24 hours with s-tui which is a terminal UI for the Ubuntu stress tool.
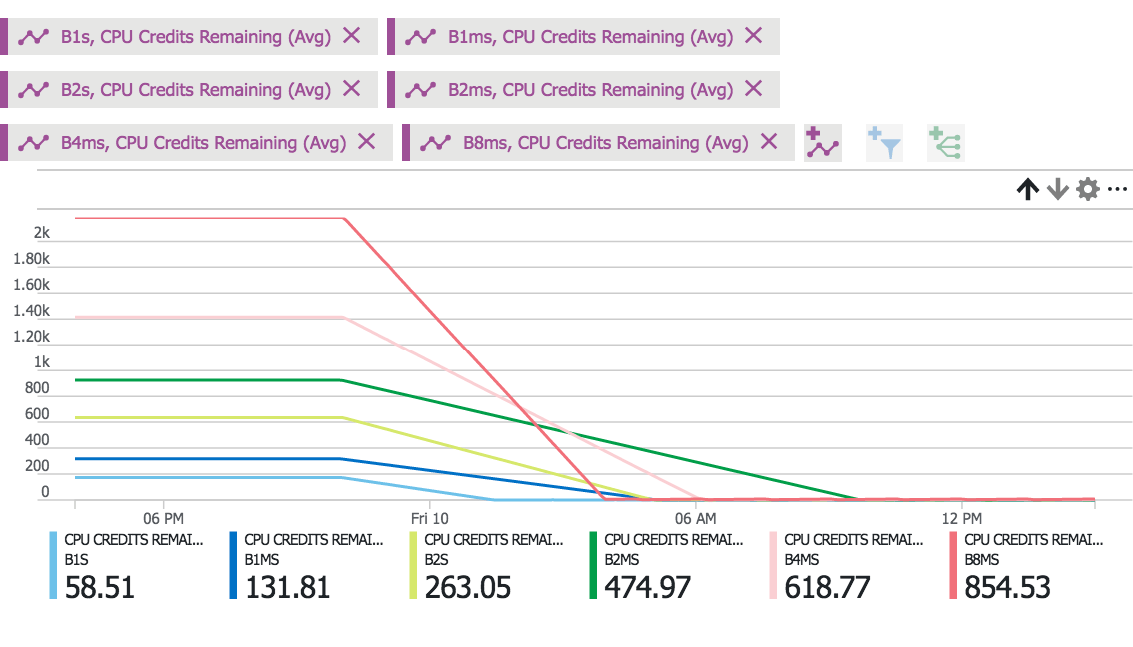
As you look at the graphs below, note these key things:
- The upper graph is for the credits spent
- The lower graph is the CPU usage in the same time period. Note as soon as the credit bank is exhausted the CPU usage of the VM is throttled to the
Base CPU Perf - As expected
Standard_B1sis the first size to spend its credit savings since it has the smallest max credit limit - The
Standard_B8msis the second size to exhaust its credit savings. This is because of the delta between theMaximum CPU usage (i.e. 800%)and theBase CPU Perf (i.e. 135%) - Surprisingly, the
Standard_B2msis the size that can burst to max usage the longest i.e. for nearly 12 hours
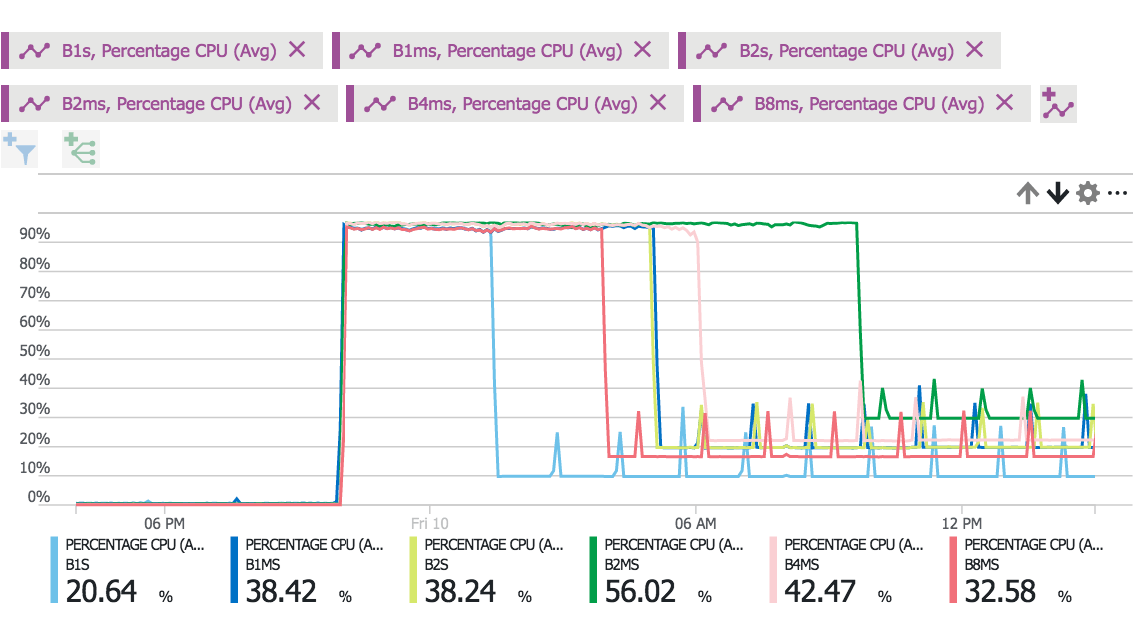
NOTE In the CPU load graph above, the usage for multi-core VM sizes is divided equally amongst all the cores and represented on a scale of 0 to 100%.
Recap
Let’s zoom out the time scale and review the VM usage and CPU load for all the B-series sizes over the course of two days.

Formulas
Let’s also recap the various formulas we used in this discussion
Starting Credits = 30 x # of Cores

Current CPU usage < Base CPU perf of VM  = Increase credit balance
Current CPU usage > Base CPU perf of VM  = Decrease credit balance
Current CPU usage == Base CPU perf of VM = No change in credit balance

(Base CPU perf of VM - CPU Usage) / 100 = Credits bank or use per minute
More information
Reach out if you have any questions! Feel free to follow me on
- Twitter - @singhkays
- LinkedIn - https://www.linkedin.com/in/singhkays/